How to Make a Zebra Cake
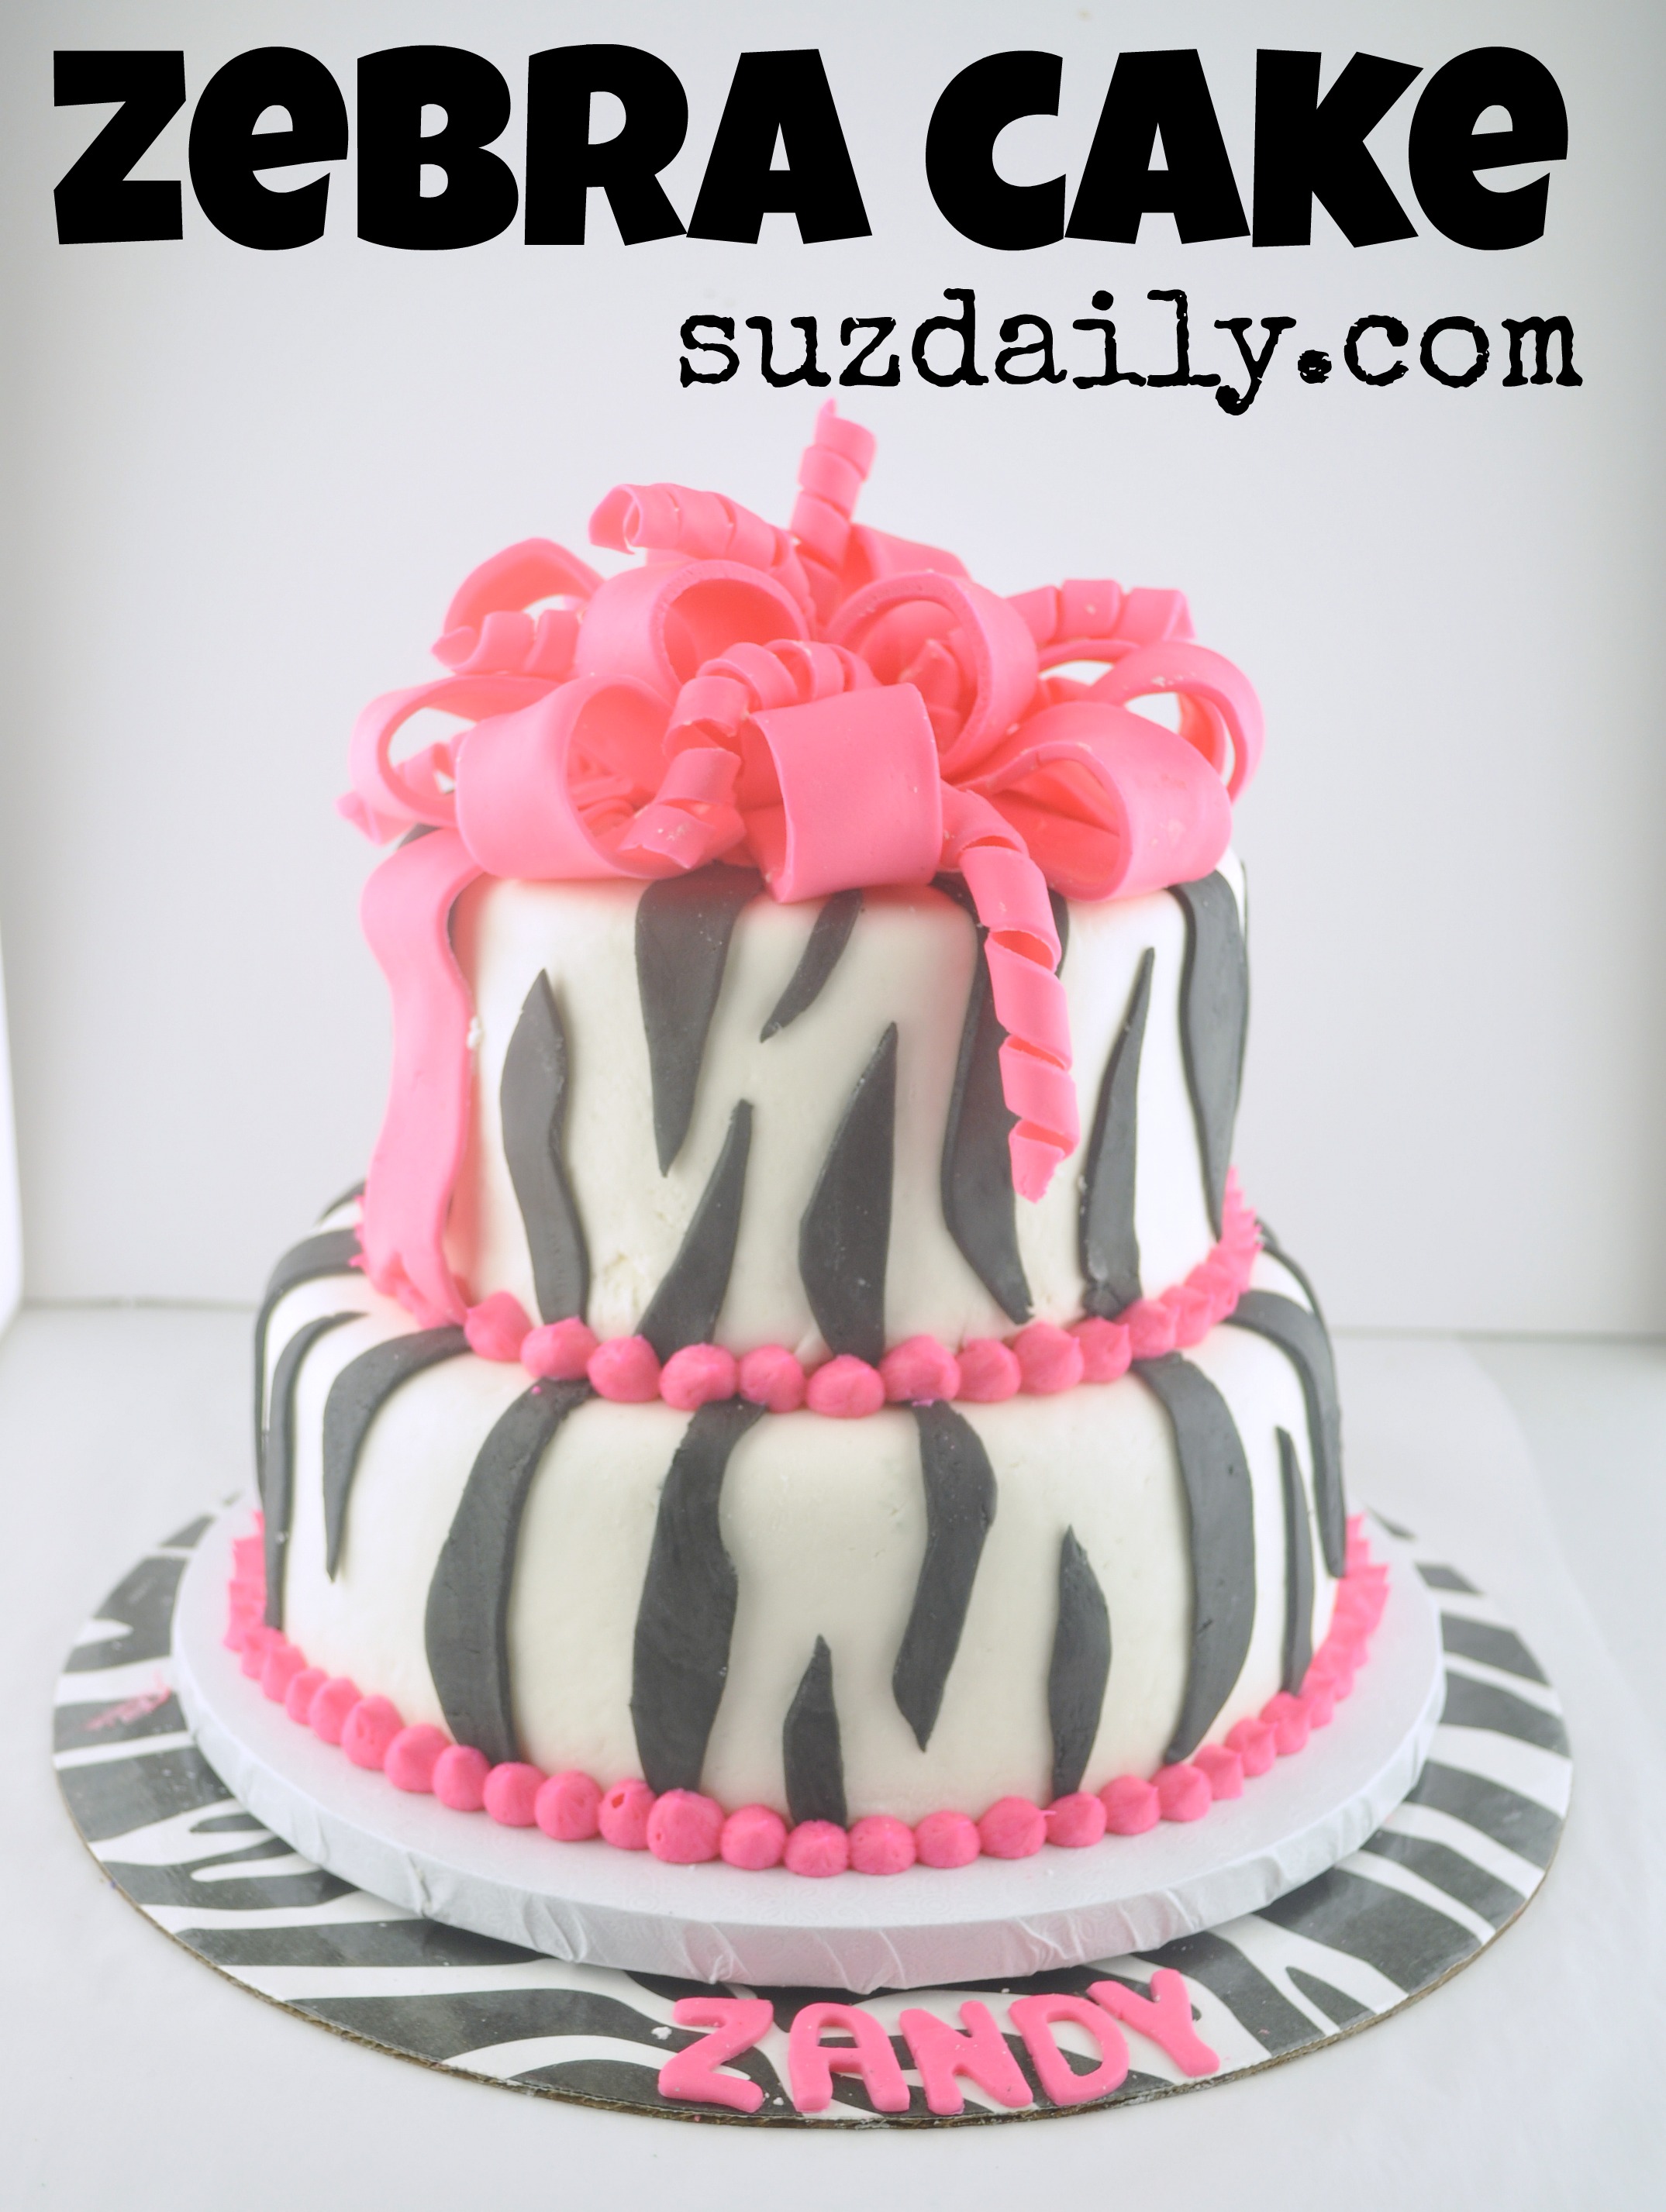
Here is the adorable zebra cake I made with Alexandra for her 11th birthday. I love how girly it is! Alexandra loves watching Cake Boss and was able to help with the construction of this zebra cake. We looked through so many cake photos and finally decided to do something like this. She didn’t want something princessy, but at the same time she didn’t want her birthday cake to be too girly. We didn’t even do a party for her this year, we just decided to have cake and ice ream with some neighborhood friends. This is perfect cake for a pre-teen girl. We looked at so many photos and decided to try this. This zebra cake is very simple. You just have to start early so the bow has time to dry before serving the cake. Keep reading to see more of this fun zebra cake for a birthday! Keep reading for details on how to make this zebra cake.
Okay, to start – a disclaimer. I am not a professional cake decorator. I make cakes for each of my kids birthdays. With practice, I’m slowly getting to where I am happy with what we make. To start, let’s go over what you will need for this zebra cake.
Step 1 – How to make a Zebra cake – Gather supplies
To prepare:
- Two eight inch cakes, trimmed to about 1.5 inch height
- Two six inch cakes, trimmed to about 1.5 inch height
- (For the cakes, start with a white cake mix recipe – no yoke)
- One large batch of buttercream, the recipe I use can be found here.
- Two batches of Marshmallow fondant, the recipe is found here.
To purchase:
- Large 1.5 inch dowel for the bow
- small 3/8 inch dowel also for the bow
- Fondant roller
- Fondant cutter
- 10 inch cake base
- larger zebra stripe base (optional)
- ABC cutters for the name
- straws or other supports for lower level of the cake
- 8 inch round for lower cake
- 6 inch round for upper cake
- large bamboo skewer for final assembly
Step 2 – How to make a Zebra Cake – Prepare Zebra Cake Layers
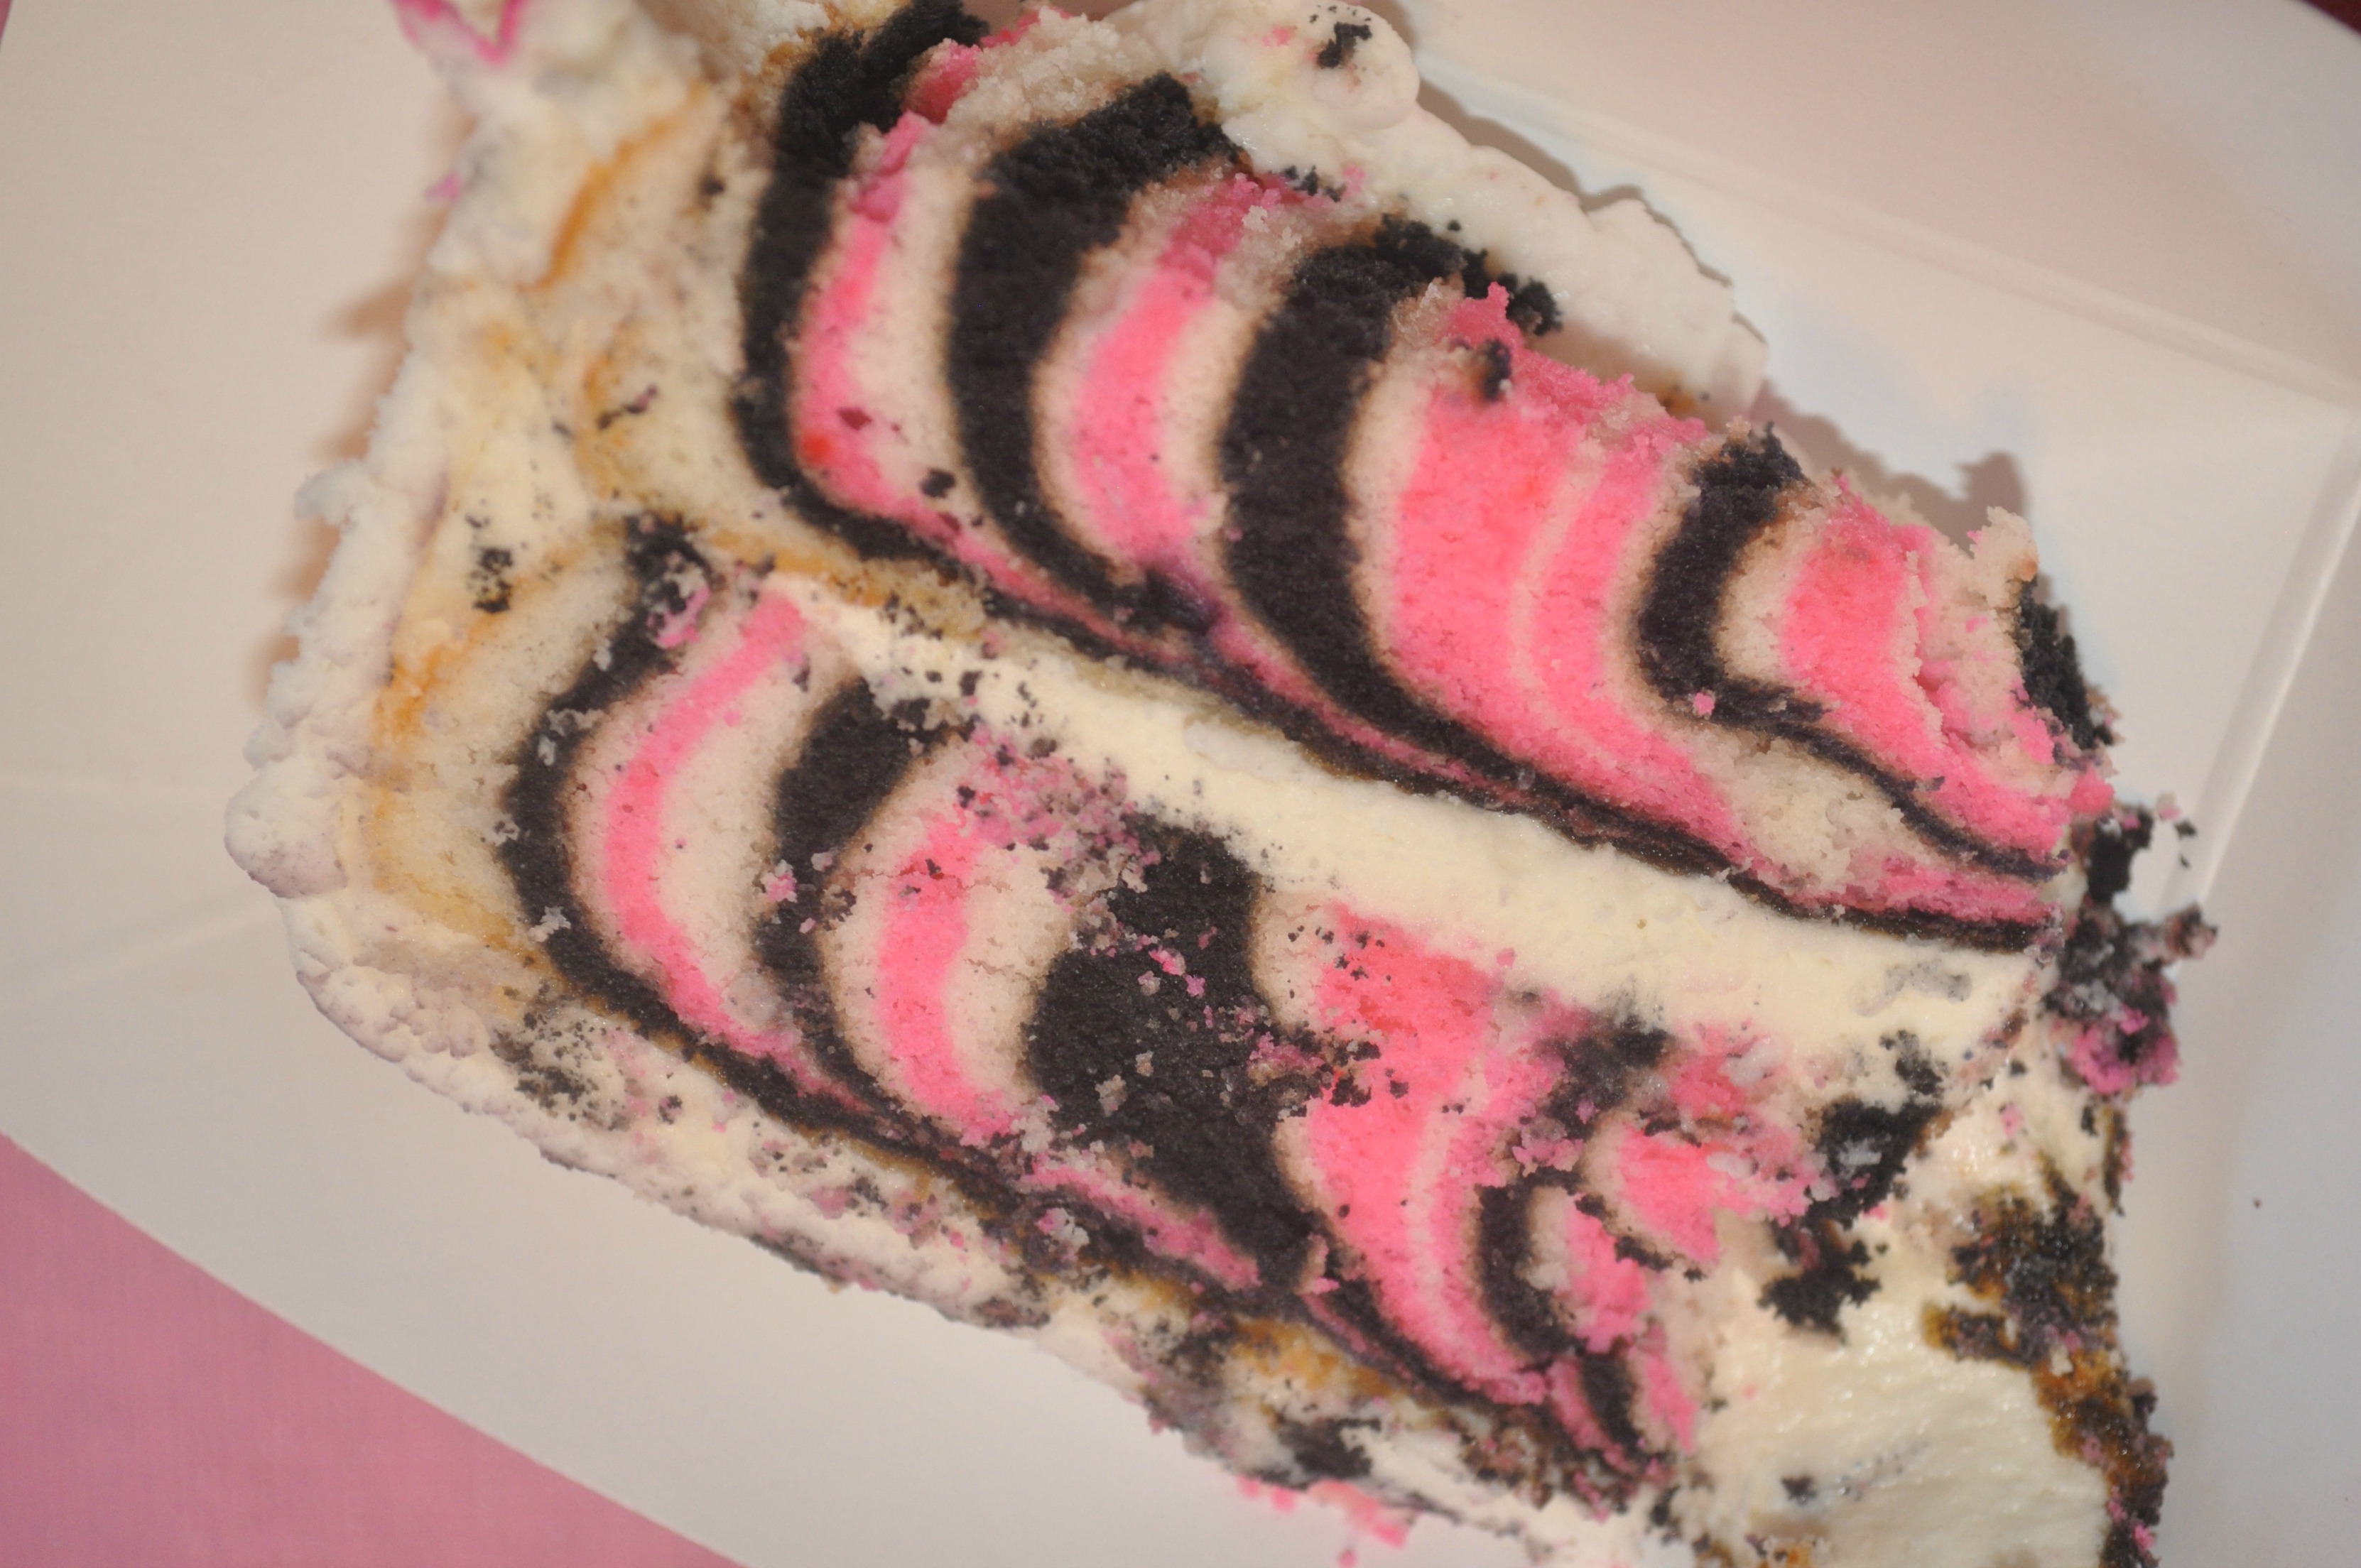
You may want the inside of your cake to have zebra stripes as well. For this, spit all the cake batter into three parts. I kept 1/3 of the batter white, dyed 1/3 pink (using Americolor deep pink), and dyed 1/3 black (using Americolor super black). There are thousands of blog posts out there to show how to do this. Basically, you add a blob of white, then a blob of pink inside of that, then a blob of black and continue until the pan is full. As the batter spreads you will have a nice zebra stripe pattern on the inside of your cake.
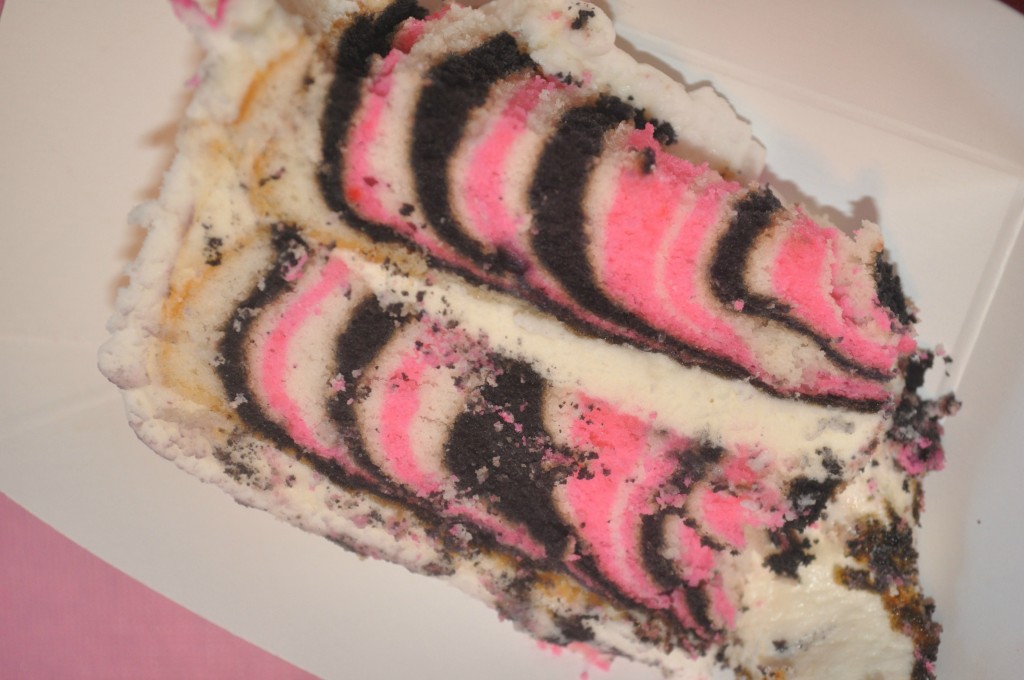
When you slice into the cake you will have fun zebra stripes! Sorry no time for a fancy photo when kids want cake! If I made this again I would add more batter at a time – maybe a cup for each stripe. I think my stripes look too small. Freeze the layers before decorating. Do not try to do too much in one day.
Step 3 – How to Make a Zebra Cake – Dye Fondant and Buttercream
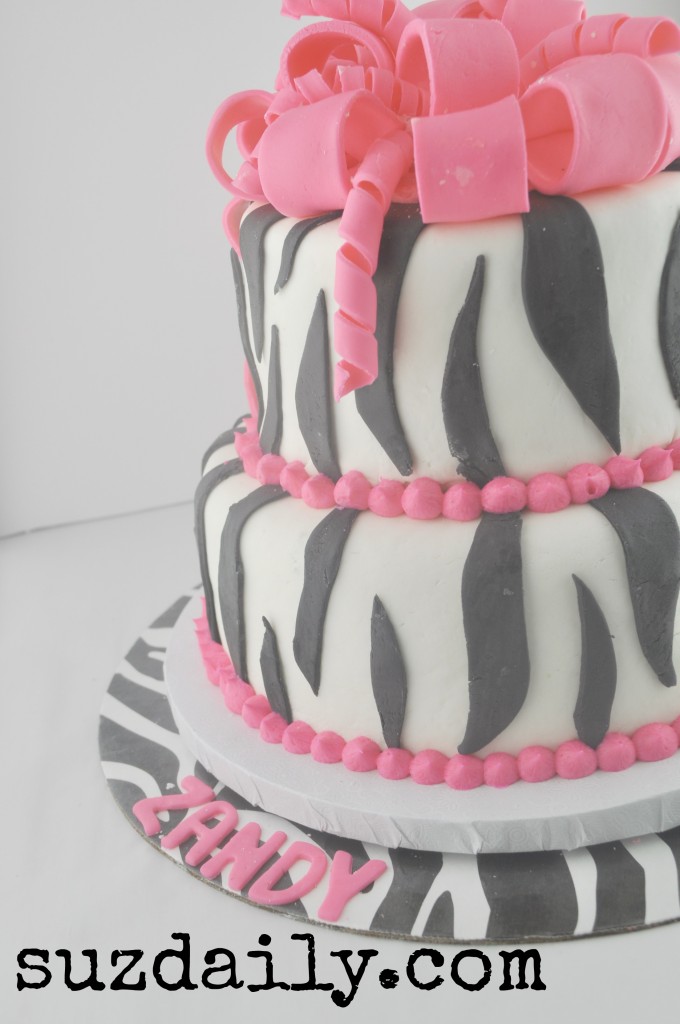
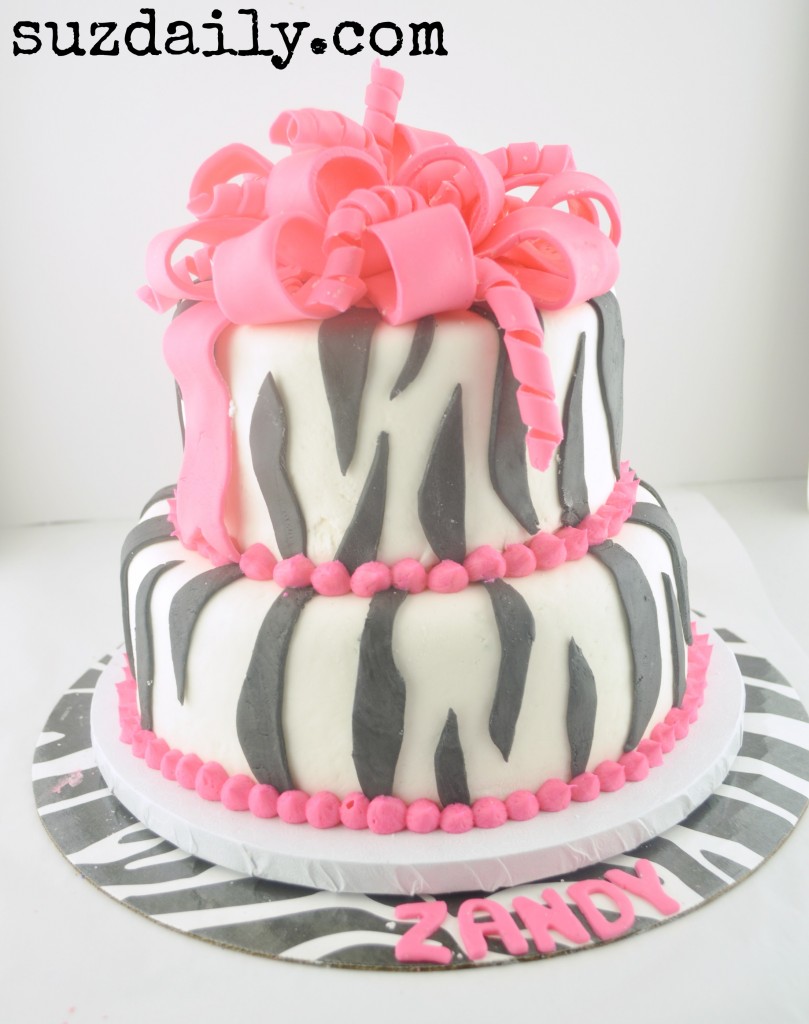
The fondant for this zebra stripe cake should be about 1/2 white and 1/4 deep pink and 1/4 black. Always make more than you think you will need. I ran out of pink fondant so I made the circles around the edges with buttecream dyed with the Americolor deep pink. This has to be done several days in advanced so that you have time to make the bow. The bow needs a couple of days to dry. Because color develops over time only bring the fondant to a dark gray color. You can always add more dye later.
Step 4 – How to Make a Zebra Cake – Assemble the Bow Cake Topper
Making the bow is very easy! Again, there are hundreds of blog posts that explain the process in great detail. I took the fondant, rolled it thin, cut it 1.25 inches wide. I then cut the strips 5-6 inches long. They don’t have to be exactly the same. I then wrapped the wide strips of fondant around the large dowel, pinching the edges and sealing with water if needed. Allow these loops to dry at least 2 days, maybe more if you live in a humid climate. If you want you can make the bow out of gumpaste. It dries much faster. I am fine just using fondant. Here is a great post with more detail. This blog post also has a lot of information on making fondant bows.
For the smaller more springy portions of the bow, cut the fondant into thin strips about 3/8 inch but it doesn’t have to be perfect. Wrap these around the small 3/8 inch dowel, or even a pencil. This blogpost helped me with this portion of the bow.
Allow all these loops to dry, dry dry! Assemble just before you are going to decorate the cake. I used royal icing to hold it all together. You could also use melted chocolate.
Step 5 – How to Make a Zebra Cake – Decorate the Cake
Now that everything is dry and ready, decorate the zebra cake. Start by trimming the cake layers so the height is equal. I used two eight inch cakes that are 1.5 inches high with a layer of buttercream in between. Cover the stacked layers of the zebra cake with buttercream. After you add the buttercream layer, smooth it and cover with fondant. After the white fondant cover with strips of black fondant to make the zebra pattern. For stacking the cake add a ring of straws into the eight inch cake layer to support the six inch cake layer. After you stack the top on the bottom place a skewer through the entire cake. Look at this minion cake post to read more about stacking cakes. It really is pretty easy and does so much for the cakes.
Next add either balls of pink fondant or pink buttercream to the bases of the cakes to add more detail and hide any flaws in the cake. Add the child’s name at the bottom of the base. So fun!!!
I hope you have a chance to make this fun zebra cake for your next birthday celebration!
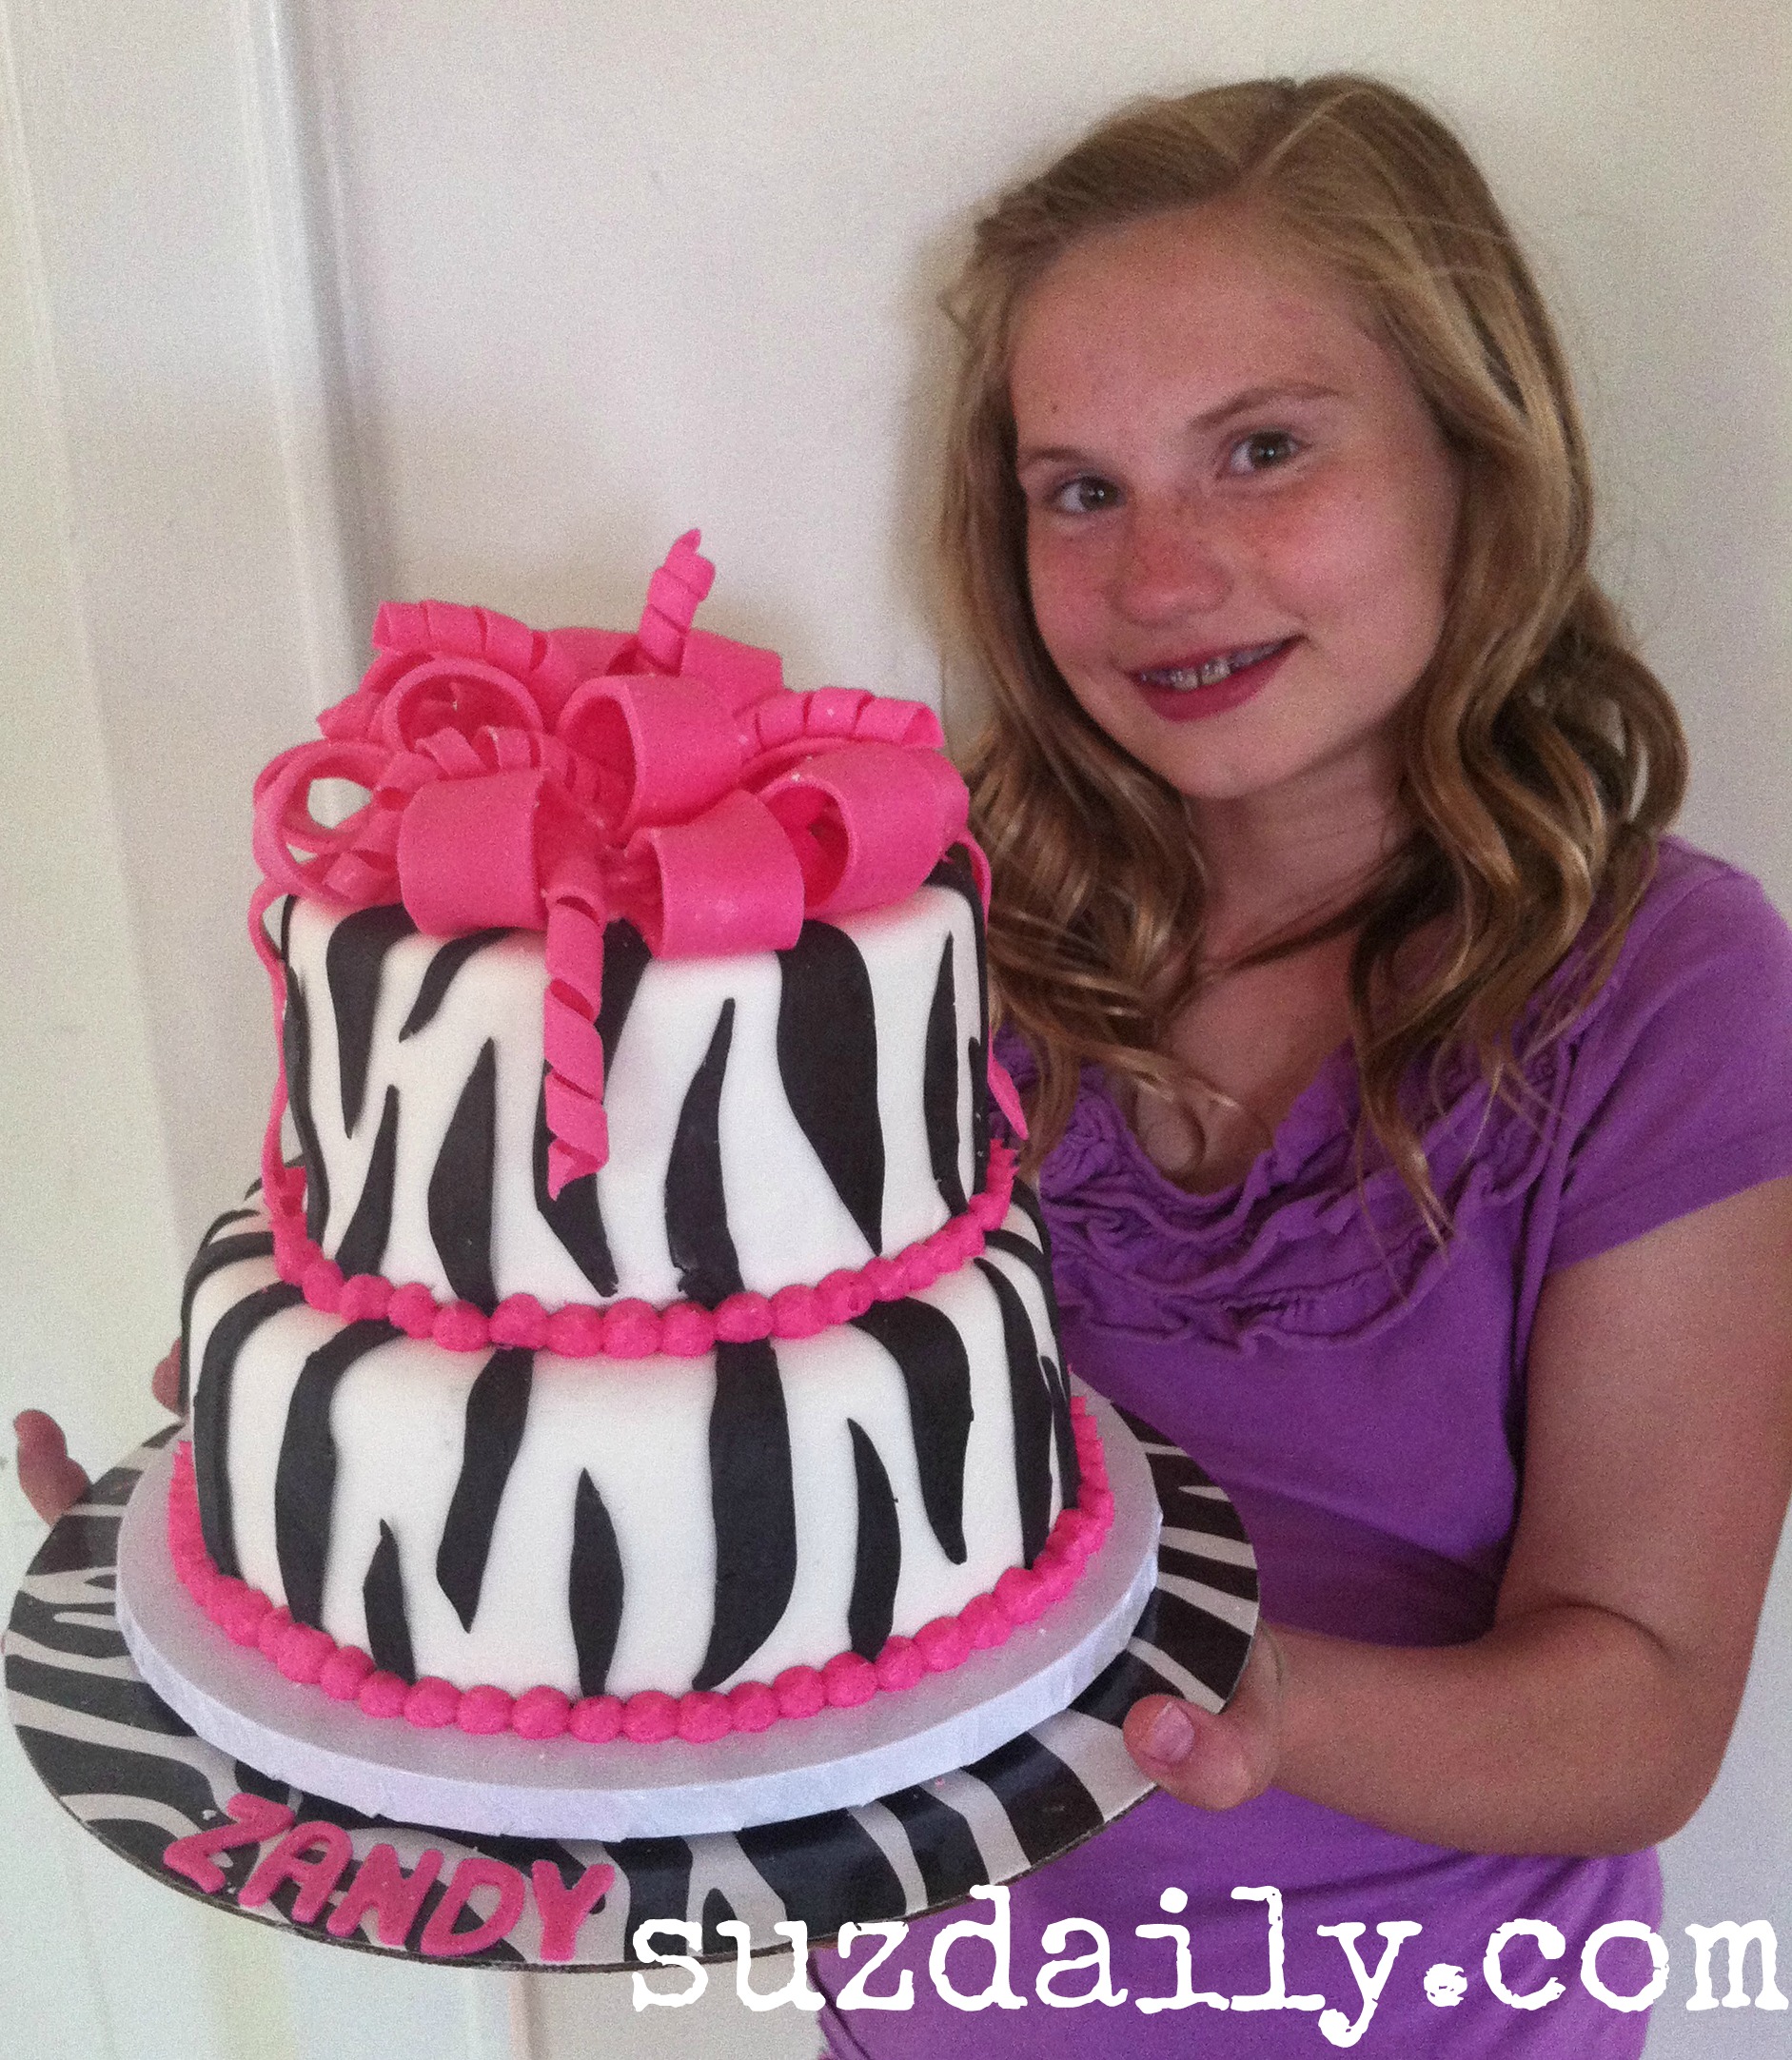
Happy 11th Birthday Alexandra! We love you so much!! Let’s hope we have a reason to make this cake sometime soon.


