How to Make Lion House Rolls
Thanks so much Beccacrocker for all your experiments with these rolls! A little background… we have been trying to get perfect holiday rolls for a couple of years now. We love the rolls served at the Lion House restaurant in Salt Lake City, Utah but have decided that the recipes floating around the internet and even in their cookbook are not what you eat in the restaurant. So we took that recipe, sweetened it a bit and came up with the perfect hybrid between a dinner roll, a crescent roll and a lion house roll. This will be our go-to holiday roll. In the past we used a rich crescent roll but found they were really dense the second day. We did more research and found out that all the egg makes the bread dense the second day. Last Easter I was out of bread flour and found that my rolls were so light and fluffy using all purpose flour. After a couple of hours on the phone and probably 12 hours of Becca’s test kitchen here is what she came up with. This is what we will use – for now! Thank you Becca for all your hard work on this one! She also tried a few make ahead options to allow for less work on Thanksgiving day.
Keep reading for the full recipe and instructions:
Soft Dinner Rolls: (modified Lion House Recipe)
- 3 ¼ cups warm water (110 degrees)
- 2 T yeast
- 1 ¼ c sugar (try 3/4 -1 c honey someday)
- 1 c dry milk powder
- 1 Tbsp sea salt
- ¾ c. soft butter
- ¼ c. shortening (room temperature) (or you may use all butter)
- 2 eggs (room temperature)
- 1200 g all-purpose flour (9 cups)
Step 1 – Mix and Kneed the dough
- Beat together yeast, warm water, and sugar. Let stand 5 min. The mixture will start to get frothy.
- Add butter, shortening, salt, dry milk, egg, and about 4 cups of flour.
- Beat slowly until smooth, and beat for about a minute to help add air bubbles to the dough and develop the gluten.
- At this point, switch to the dough hook and gradually add the rest of the flour. This dough is very soft and slightly sticky. Don’t add too much flour, or you will have dense rolls. Knead for about 7 more minutes. If necessary, coat the dough with a bit of cooking spray to make it easy to handle before transferring to a container for rising.
Step 2 – Allow the dough to rise
- Place dough into bowl coated with cooking spray. Cover the dough with saran wrap that is also coated in cooking spray. Cover the container, marking the height of the dough on the side. Let the dough rise 1 ½ hours until doubled. (In my very dry climate I like to cover the dough first with saran wrap, then with a tight lid on the container and last with a damp rag on top of the entire container to keep the dough from developing a dry ‘skin.
- Optional step: after this rise, take the dough out onto a sprayed or floured surface and carefully give it 2 folds (like folding a business letter) and place back into the container. Let rise one more hour or until the dough it more than double from the original level. This helps get more air bubbles into the dough and improves the overall texture of the roll.
Step 3 – Form the rolls
- For Crescent rolls: Cut dough in half, then cut each ½ into 3 balls. Roll each ball out into a large circle and brush the circle with melted butter. Cut the circle of dough as you would a pizza – into 8 equally sized wedges. Roll up tightly and place on a pan tucking the top edge under. Brush with melted butter. Makes 48 crescent rolls.
- For Regular round rolls: Cut dough into about 48-56 pieces, roll into ball shape, dip or brush with butter. This will fill 2 baking sheets .
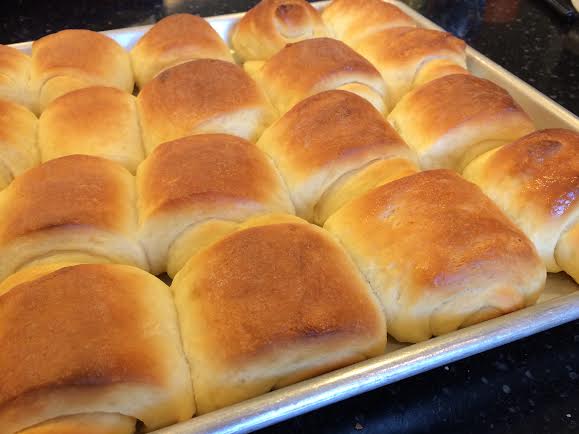
- For Lion House rolls: Cut dough into thirds. Roll a portion of the dough into a rectangle 10-12 inches high and about 18-20 inches long. Trim the ends in order to make a perfect rectangle. The ends can be added to remaining dough. Brush the entire rectangle with butter, then cut down the center lengthwise so that you have 2 long rectangles that are about 5-6 in tall and 18-20 inches wide. Now, using your left hand in the shape of an “L”, measure about 2 – 2 ¼ inches (the size of your thumb) and cut strips going all the way across. You will have about 8 cuts making 18 rolls with this amount of dough. Now, take each individual rectangle, stretch it slightly and flip it up over itself to create the signature lion house folds. Place each roll seam down on a baking sheet and brush tops with melted butter. Fill each standard quarter size baking sheet with about 24-30 rolls. You will have 2 full sheets by the time you are finished, making 38-60 rolls total.
NOTE – there are some excellent youtube videos showing how to form each of these types of rolls. I have watched them over and over and have just included the basics in these instructions.
Step 4 – Allow the Rolls to rise
Let rise for 1 hour. Bake in a preheated oven at 400° for about 10 min for crescent – about 20-25 for sheet of regular round rolls or for Lion House. Brush again with melted butter as soon as they come out of the oven. Cool on baking sheet for at least 5-10 minutes before serving. If you eat them too soon, they may taste a little yeasty and may be too doughy on the inside.
***Make Ahead Options:
- Frozen Formed Rolls: Immediately after step 4, place formed dough shapes onto a buttered, covered tray in the freezer. A few hours later or when they are solidly frozen, break apart the frozen rolls and store in a zip-lock bag in the freezer. It is probably best to do this within 1 week of baking to limit the freezer-burnt flavor. I tested 2 days and the taste was great. When you are ready to bake them, butter your baking sheet and place frozen rolls on sheet about 24-30 per sheet, or a little less per sheet for the crescents. Let sit out at room temperature for at least 3 hours. Continue baking with step 5 above. We love this option for a busy Sunday at church. Place the frozen rolls on the counter and when you come home three hours later they should be ready to go into the oven!
- Chilled Dough: After step 3 above, slightly press down the dough. Cover and store in a tightly covered container in the coldest spot in your fridge. Let sit in fridge for 6-48 hours until you are ready to form and bake the rolls. When ready, remove dough from fridge and continue with step 4 above. The dough will be chilled making it easy to work with. Let rise about two hour and 15 minutes until soft and increased at least 50% in volume. Bake as directed above.


